Quick Start Guide
This tutorial will walk you through installing and configuring Cloud Inquisitor. The tool currently runs on Amazon Web Services (AWS) but it has been designed to be platform-independent.
This tutorial assumes you are familiar with AWS & that you have an AWS account. You’ll need to retrieve your Access Key ID and Secret Access Key from the web-based console. You can also
use AWS STS tokens as well.
It’s highly recommended you first use the quickstart to build Cloud Inquisitor. However if you want to explore additional options please see additional options.
Installing Cloud Inquisitor
Getting Cloud Inquisitor (cinq) up and running involves the following steps:
- Configure AWS credentials and variables for cinq.
- Use Packer to build your cinq AMI.
- Launch your AMI, login, and add your accounts!
Build Requirements
- Packer > v1.1
- AWS Credentials - API Keys or an AWS instance role with appropriate permissions.
- An existing VPC and subnet for the packer build instance and eventually the cinq instance to live (can be the same if you wish). TL;DR: cinq will not create the vpcs/subnets for you
1. Setting Up
- Export your AWS key credentials into the local terminal that you intend to execute packer from.
Unix-based Systems
export AWS_ACCESS_KEY_ID=AKIAxxxxxxxxxxxxxxxxx
export AWS_SECRET_ACCESS_KEY=xxxxxxxxxxxxxxxxxxxxxx
Windows
set AWS_ACCESS_KEY_ID=AKIAxxxxxxxxxxxxxxx
set AWS_SECRET_ACCESS_KEY=xxxxxxxxxxxxxxxxxx
Clone the Cloud Inquisitor (cinq) repo:
git clone https://github.com/RiotGames/cloud-inquistor
In the
packerdirectory, copyvariables/variables.json.sampleto your ownvariablesfile:cd packer && cp variables/variables.json.sample variables/mycinqenv.json
Edit your json file and provide your parameters as per the
code blockbelow.
The example file variables/variables.json.sample provides sample variables needed to configure cinq. A full list of parameters is available in the build.json file. For detailed build information please see additional options.
NOTE: You will need to change some of these items as they are environnment-specific.
The easiest way to get cinq up and running is to ensure you’ve properly configured all of the values in the sample file and most importantly the app_db_setup_local is set to True. The will install a local mysql-server on the instance itself and get the database setup for you.
{
    "ec2_vpc_id":                   "vpc-xxxxxxxx",       (This is the VPC for the packer BUILD instance)
    "ec2_subnet_id":                "subnet-xxxxxxxx",    (This is the subnet for the packer BUILD instance)
    "ec2_source_ami":               "ami-0a00ce72",       (This is an Ubuntu 16 AMI but you can use your own custom AMI ID)
    "ec2_instance_type":            "m4.large",
    "ec2_region":                   "us-west-2",
    "ec2_ssh_username":             "ubuntu",
    "ec2_security_groups":          "sg-xxxxxxxx",        (Ensure that you have SSH open from your workstation or packer build will fail)
    "ec2_public_ip_enable":         "False",              (If you don't have VPN or DirectConnect to your VPC, set this to True)
    "app_kms_account_name":         "my_account_name",    (Optional: for using KMS encrypted userdata for your DB URI)
    "app_use_user_data":            "False",              (Set to True if you want to use KMS encrypted userdata for your DB URI)
    "app_apt_upgrade":              "True",
    "app_log_level":                "INFO",
    "app_db_uri":                   "mysql://cinq:changeme@localhost:3306/cinq",  (This points to your database (See Notes))
    "app_db_user":                  "cinq",
    "app_db_pw":                    "changeme",
    "app_db_setup_local":           "True",               (Easiest way to get cinq running, set to False if you want to use external DB)
    "git_branch":                   "master"
}
Save this file!
For more advanced and secure options, please see the additional options documentation. For example:
- If you want to use a remote database as opposed to the local database provided by cinq, check out the databases section
- If you don’t wish to keep database credentials in flat configuration files on the instance, you may use KMS to encrypt these variables and pass them to the cinq instance via AWS userdata databases section
2. Building an Image
All the files required to build the image are in the packer subdirectory. Remember to check that your AWS Credentials have been properly exported or the next command will likely hang and time out.
Execute the following command from the packer directory in the cinq repo to have packer build your custom AMI.:
packer build -only ami -var-file variables/mycinqenv.json build.json
Assuming your variables are correct and you have the proper AWS permissions, packer should create an AMI. If steps fail, try executing packer with the -debug flag and step through the build process to identify where it is breaking. If it succeeds you should see something like this. Ensure you note the AMI ID that was created as you’ll use it in the next step
==> ami: Waiting for the instance to stop...
==> ami: Creating the AMI: cloud-inquisitor @master 2017-11-22 18-22-37
**    ami: AMI: ami-xxxxxxxx **
==> ami: Waiting for AMI to become ready...
==> ami: Adding tags to AMI (ami-xxxxxxxx)...
==> ami: Tagging snapshot: snap-xxxxxxxxxx
==> ami: Creating AMI tags
    ami: Adding tag: "Accounting": "yourteam.accounting.tag"
    ami: Adding tag: "Name": "Cloud Inquisitor System Image"
    ami: Adding tag: "SourceAmi": "ami-0a00ce72"
    ami: Adding tag: "GitBranch": "master"
    ami: Adding tag: "Owner": "teamname@yourcompany.com"
==> ami: Creating snapshot tags
==> ami: Terminating the source AWS instance...
==> ami: Cleaning up any extra volumes...
==> ami: No volumes to clean up, skipping
==> ami: Deleting temporary keypair...
Build 'ami' finished.
3. Launching your AMI
Cloud Inquisitor is designed to run from a security/audit AWS account and to be able to operate on multiple AWS accounts, using STS AssumeRole. See the following diagram to understand how cinq operates and where the various IAM elements need to be configured:
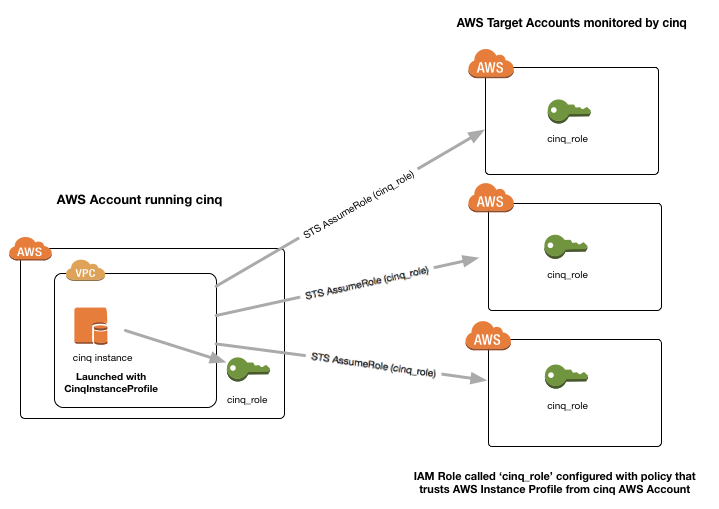
To ensure this is possible, you will need to create an Instance Profile so it can use AssumeRole in the target accounts it is auditing. Below is a sample of the instance profile you should create:
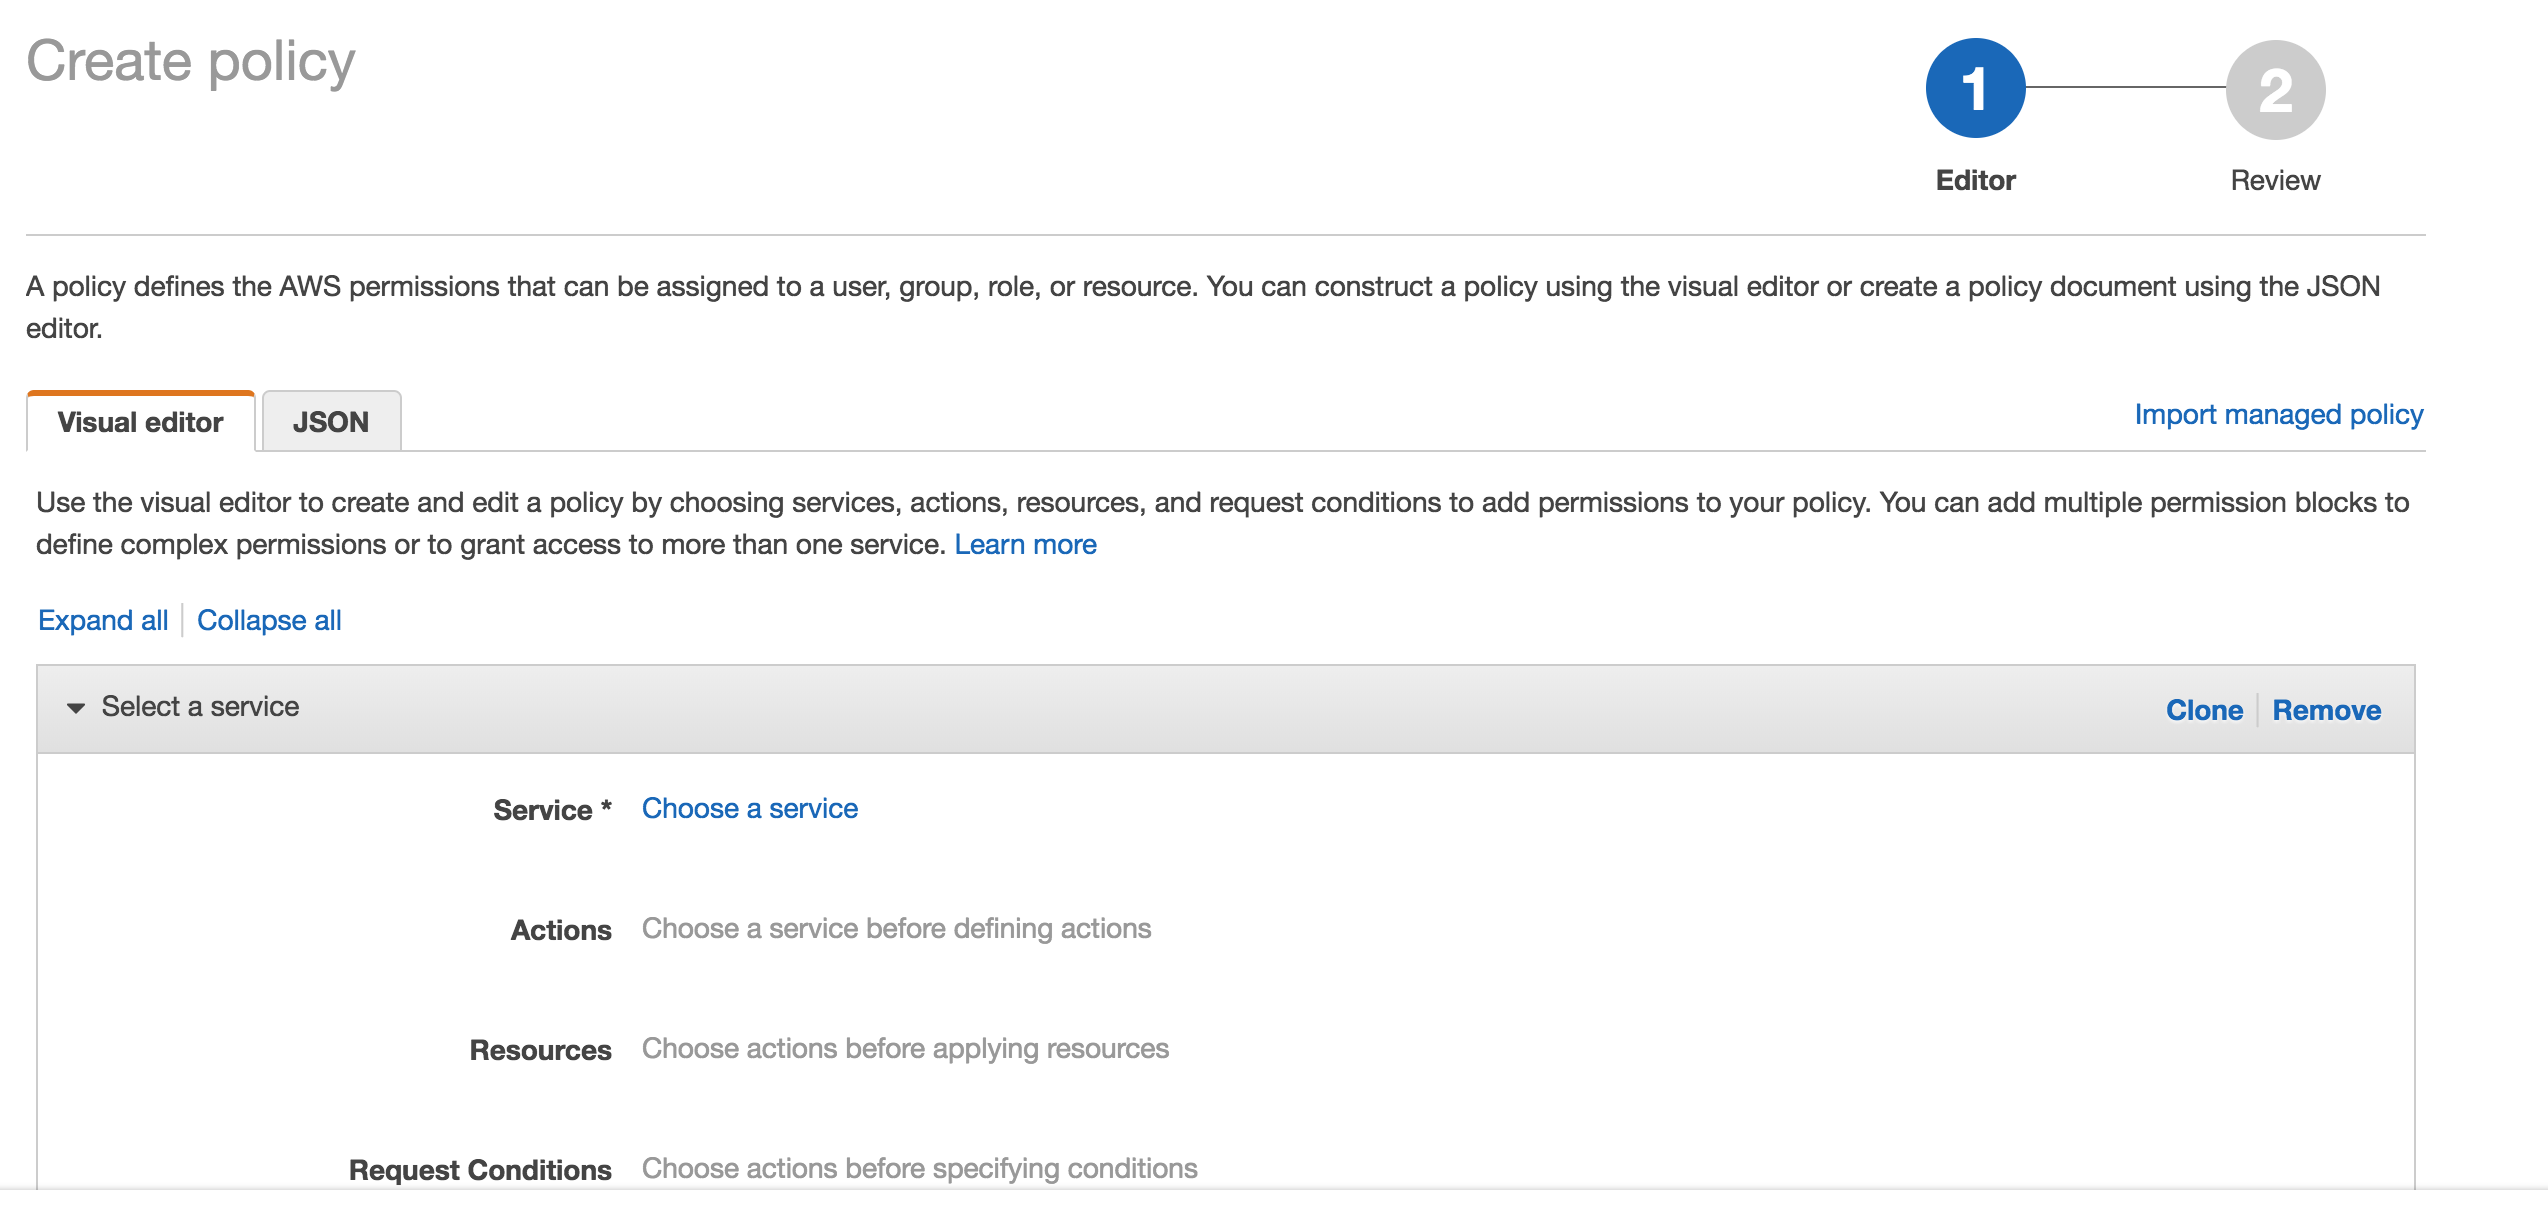
Create an IAM policy https://docs.aws.amazon.com/IAM/latest/UserGuide/access_policies.html (within the AWS Console) as follows
{
    "Version": "2012-10-17",
    "Statement": [
        {
            "Sid": "CinqInstancePolicy",
            "Effect": "Allow",
            "Action": [
                "ses:SendEmail",
                "ses:SendRawEmail",
                "sts:AssumeRole",
                "sqs:SendMessage*",
                "sqs:DeleteMessage*",
                "sqs:GetQueue*",
                "sqs:ListQueues",
                "sqs:PurgeQueue",
                "sqs:ReceiveMessage",
                "cloudwatch:PutMetricData",
                "cloudwatch:GetMetricStatistics",
                "cloudwatch:ListMetrics",
                "ec2:DescribeTags"
                ],
            "Resource": [
                "*"
            ]
        }
    ]
}
Sample screenshot of what you should see when creating the policy:
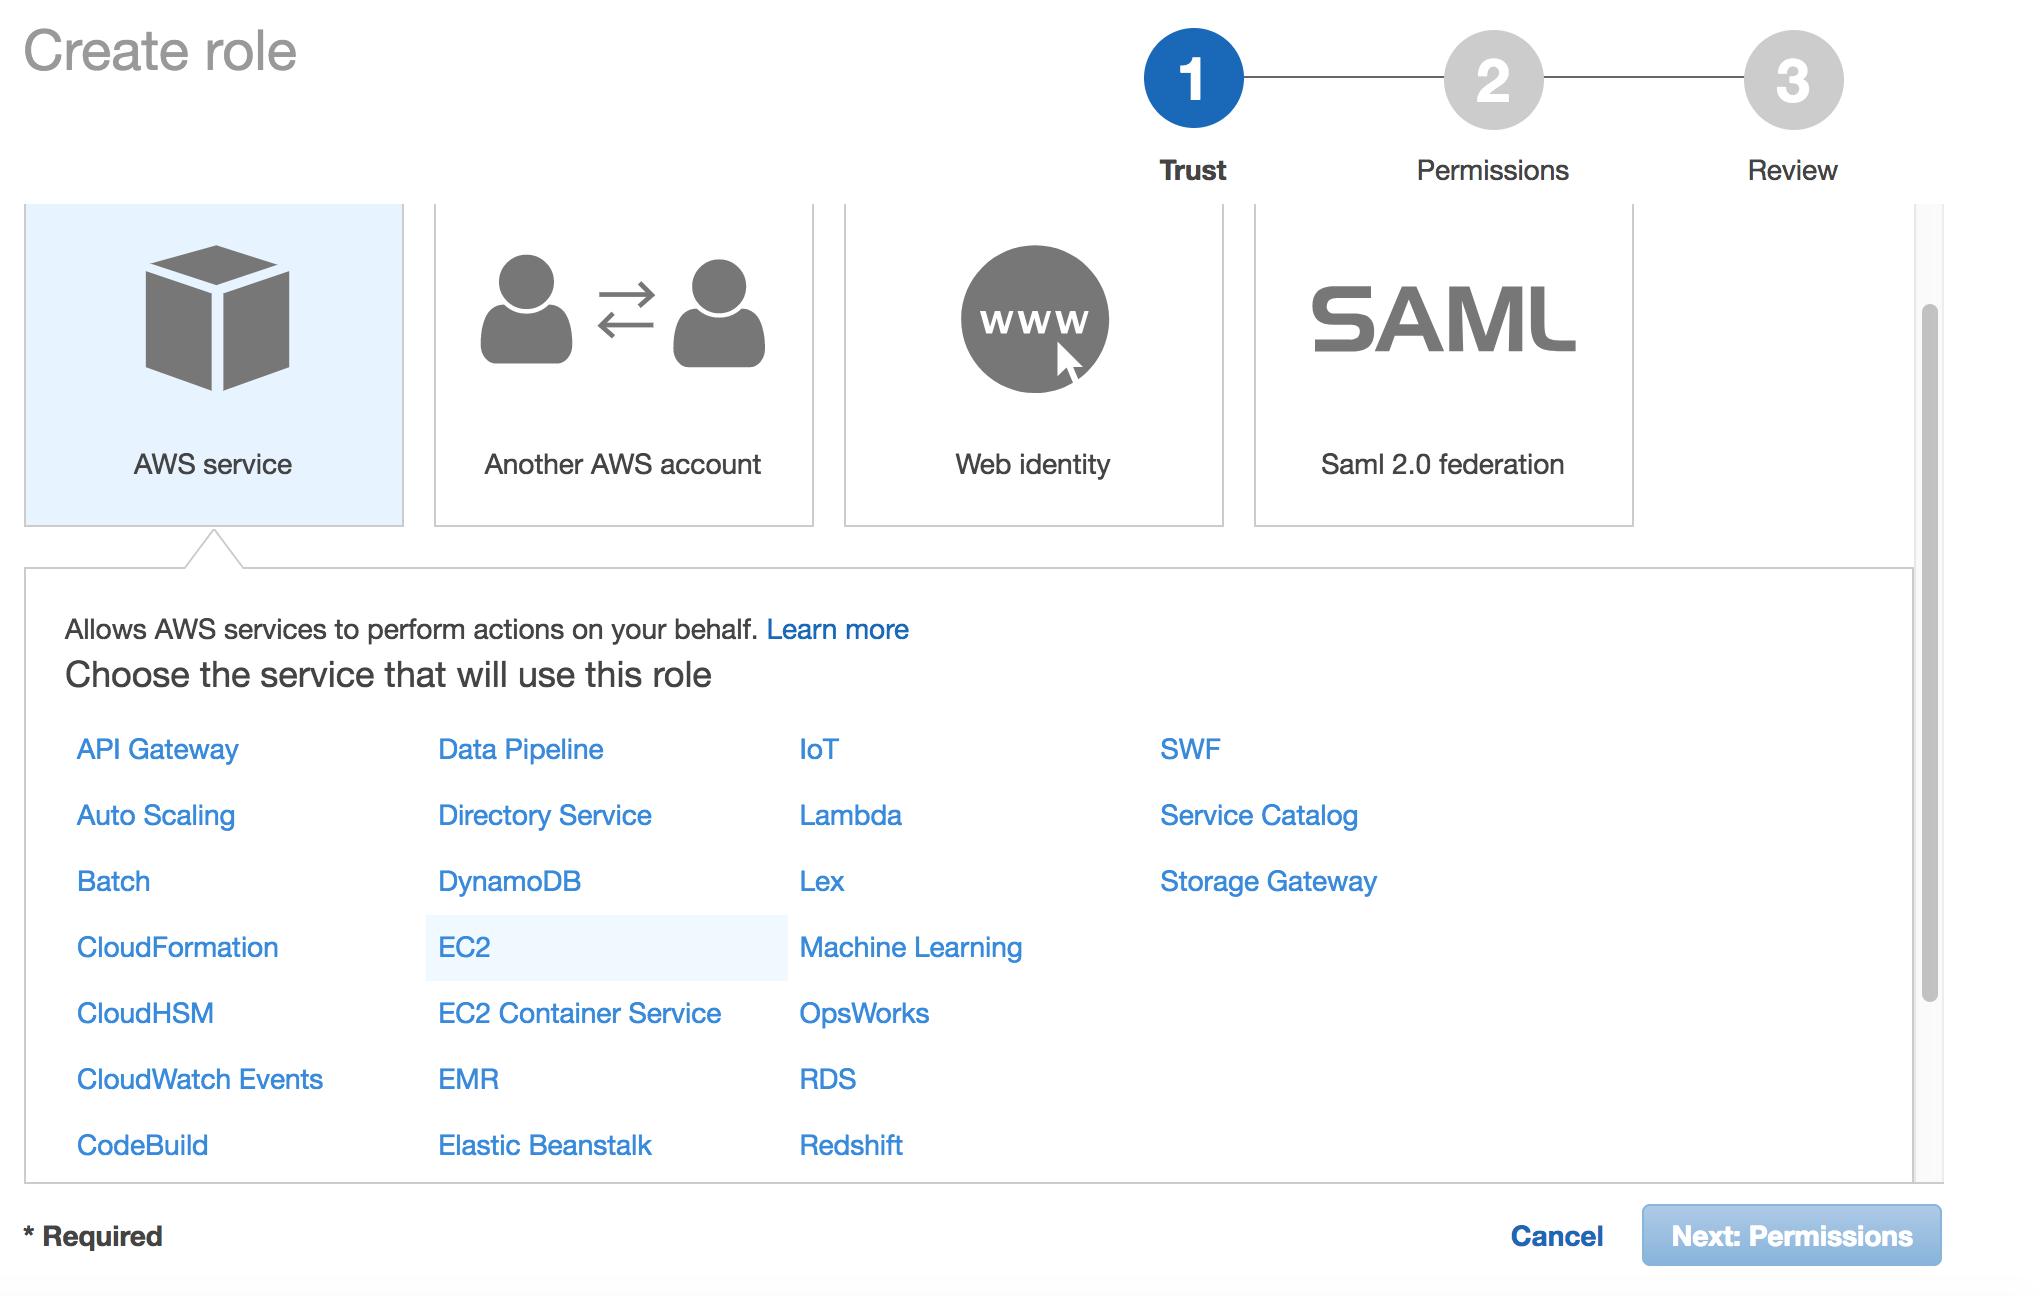
- Create an IAM Role (within the AWS Console) and bind the above policy (that you have just created) to it
- (Optional) For each account cinq is auditing you will need to setup a trust role for EACH target account (including the one you are running cinq from):
On the target account, create an IAM role called cinq_role and attach the AWS managed ReadOnly policy along with the following custom policy:
{
    "Statement": [
        {
            "Sid": "",
            "Effect": "Allow",
            "Resource": [
                "*"
            ],
            "Action": [
                "cloudtrail:*",
                "ec2:CreateTags",
                "ec2:CreateFlowLogs",
                "ec2:DeleteTags",
                "ec2:DeleteVolume",
                "ec2:StopInstances",
                "ec2:TerminateInstances",
                "iam:AttachRolePolicy",
                "iam:CreatePolicy*",
                "iam:CreateRole",
                "iam:DeletePolicy*",
                "iam:DeleteRolePolicy",
                "iam:DetachRolePolicy",
                "iam:PassRole",
                "iam:PutRolePolicy",
                "iam:SetDefaultPolicyVersion",
                "iam:UpdateAssumeRolePolicy",
                "logs:CreateLogGroup",
                "logs:CreateLogStream",
                "logs:DescribeLogGroups",
                "logs:DescribeLogStreams",
                "logs:PutLogEvents",
                "s3:CreateBucket",
                "s3:PutBucketPolicy",
                "sns:CreateTopic",
                "sns:SetTopicAttributes",
                "sns:Subscribe",
                "sqs:Get*",
                "sqs:List*",
                "sqs:SetQueueAttributes",
                "sqs:Get*",
                "sqs:List*",
                "sqs:SetQueueAttributes"
            ]
        }
      ],
    "Version": "2012-10-17"
}
Sample screenshot of what you should see when creating the role (be sure to select EC2 for the type):
Trust Policy:
Note: Ensure you have the correct source AWS Account ID (that is running CINQ) and the Instance Profile Name (not the Role name) populated here.
{
"Version": "2012-10-17",
"Statement": [
{
     "Sid": "",
     "Effect": "Allow",
     "Principal": {
     "AWS": [
         "arn:aws:iam::<accountid-running-cinq>:role/<instanceprofilename>"
         ],
         "Service": "ec2.amazonaws.com"
     },
     "Action": "sts:AssumeRole"
     }
   ]
  }
You can now launch this AMI within the EC2 (Launch Instance) section of your AWS Console. When launching your AMI ensure the following:
- Ensure you use the Instance Profile to launch your cinq instance
- Configure your Security Groups should be open on
22/443so that you can connect to both theCloud InquisitorUI and the instance itself for troubleshooting.- ssh into the instance and grab the password from
/var/log/supervisor/cinq-api-stdout---supervisor-*****.log- Connect to https://<yourinstanceip> and login (username :: admin)!
You can now add new accounts under the Accounts tab in the Cloud Inquisitor UI. Please check out the user guide for further details on how to use the UI, review results and update configuration.